The Pen Is Mightier Than The Wand
Ever try to crop a person or object out of a photograph? Maybe you needed to remove the background of a photo, or wanted to isolate a subject so that it could be placed onto another image. Fairly simple concepts, but often executed poorly in Photoshop. Does any of your work look like these examples?

There are a few different ways you can cut out images using Photoshop. The technique that is used depends on the photo and the background you’re placing your subject on; the least effective being the Magic Wand Tool which creates a selection based on pixels of similar colors.
The problem is, the only time this works well is when you’re dealing with large areas of the same color. Most of the time the tool deletes ragged sections from your subject, or leaves a halo of color around it. Either way, the results can be terrible and take longer to fix than doing it by hand from the start.
The Right Way – The Pen Tool
Outlining your image with the Pen Tool gives you the most control over your subject. It’s easy to go back and fix a section of your outline, and you can keep refining your work until your results are perfect. If you ever need to hand off your work to someone else, it also allows them to pick up right where you left off without having to tweak any artwork, saving time and money.

There are no quick or easy shortcuts to getting the kind of results that the Pen Tool can give you. In most cases it’s the best way to isolate your image. It can be tricky to master, but like anything else, the more you use it, the better you’ll get at it. The Pen Tool excels at letting you outline your art with precision.
Outlining Your Image
To access the Pen Tool, go into your Tool Bar, which is located on the left of your screen. If, for some reason, it isn’t, go up to Window and then select Tools. This should bring it up. The Pen Tool is located 15 down from the top; you can also hit P on your keyboard to switch to it.
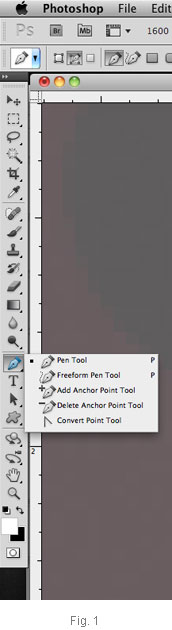
Click and hold the tool with your mouse and you’ll see a pullout menu of its related tools (Fig. 1). Focus on the tools labeled Add Anchor, Delete Anchor and Convert Point. The Add Anchor Tool allows you to add anchor points to sections of your outline that you have already drawn. The Delete Anchor Tool lets you delete points that you may have mistakenly placed on your outline. The Convert Point Tool lets you take an existing anchor point and pull handles from it. This allows you to add flowing curves to your outline. You won’t have to manually select between these three when you want to use them, Command and Alt (Mac), or Control and Alt (PC) activate them and allow you to switch between them, as long as the Pen Tool is selected.
First, you’ll want to zoom in tight on your subject so that you can get a clearer view of 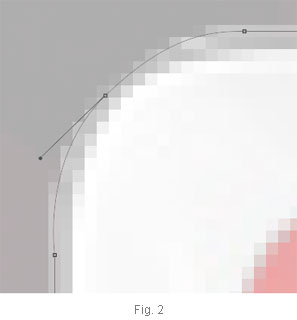 the area where you’ll place your outline. You want to be in the hazy area between your subject and the background; this is called the anti-aliasing (Fig. 2). Placing your outline in this area minimizes two areas of concern that can be associated with the Pen Tool. First, if your outline is too far from your subject, outside of the anti-aliasing, it can leave behind too much of the background of your photograph – creating a halo like effect around your subject. Second, if you place your outline too far inside the anti-aliasing, like onto your subject itself, you could begin to cut off your image and leave it looking unnaturally cropped.
The goal here is to start placing points that will form the outline around your image. You want these points to follow the natural contours around your subject. As you start placing points, notice that the Command (Mac) or Control (PC) keys will also allow you to select specific points and make adjustments. Also, if you click and drag a point, you can add a curve. Curves can be pulled and manipulated by their handles by holding down the Alt key (Mac/PC). While placing your outline, make sure you’re not inadvertently cutting off sections of your subject; pay attention to how your path interacts with your background.

Once your outline is complete, go to Window and then Paths to view your Paths Palette. You’ll notice here that Photoshop has already created a layer called Work Path; this is your outline. In the upper right hand corner of the palette (Fig. 3) you’ll notice a triangle with a few lines next to it. Click on it and go to Make Selection. The Make Selection dialog box will come up (Fig. 4). Click OK. Your outline should now be highlighted (Fig. 5).
If your Layers Palette is not open, go to Window and then Layers. Now, look at the palette and make sure that the layer you have your artwork on is selected. At the bottom of your Layers Palette is the Add Layer Mask but-ton (Fig. 6). Click it. Your subject is now free of its background.
Posted in Design Tutorials, Photoshop Tips & Tutorials
Don`t neglect your friends, share this right away.

Our marketing, design and printing experts are passionate about sharing their knowledge. We're eager to help make your vision a reality in print. Be sure to explore the rest of the Printwand blog for more reliable, easy-to-understand information.
Thank you! Thank you! Thank you! I’m self-training in Adobe and was getting SO frustrated with ‘lasso’ and ‘quick selection’! This sounds so much more up my detail-oriented alley!